
Technologies are able to improve the daily life of insurance industry. This is what we did with video object detection.
As an Insurtech we, at Moonshot Insurance, are constantly trying to find new ways to protect customers while giving them the best possible experience.
What does #TechForGood mean to you ?
1. Context
One example of this mindset is our broken screen insurance product. We created a quick, simple claim process which can be summed up in a few words: if your smartphone screen is broken, just send a picture and we will compensate you directly. No paperwork, no lengthy process!
To make this possible, we use a computer vision model which automatically detects any damage on a smartphone screen. The current process requires a photo of the turned off mobile phone to detect scratches and another one to capture the IMEI number.
This approach has proven successful, but we wondered if we could make the process even more intuitive. We decided to test real-time analysis of a video stream, directly from the web browser.
2. How to execute image detection
Before diving into video detection, let us quickly talk about object detection on a single image. Here our goal is to have a model to which we send an image, and which returns the specific feature we are interested in. In our case we are interested in knowing:
- whether there is a smartphone in the picture;
- if there is one, if its screen is damaged or not.
This technology has become quite common now and one can easily find articles and Medium posts dealing with both theoretical and practical aspects of this problem. One of the most efficient model, and the one we used in this project, is the YOLO algorithm. An architecture of this model can be found as an open-source neural network called Darknet with pre-trained weights, and methods to help us in training and predicting.
To train this kind of computer vision model, we need as many images of damaged smartphones as possible. Once we have enough training samples, in our case about 200 images, the next step is to manually select bounding boxes for each class we want to be able to detect (smartphone and damage).
Once we have our training dataset with its annotations, we can use it to train our custom YOLO model. During training, the model will learn to predict probability maps for each class we gave annotations for, with the goal of predicting bounding boxes for each object. This step requires a lot a computational power and may take lot of time even on high-end computers. We used two RTX 2070 GPUs to train our custom model, and each training took between 8 and 10 hours to complete.
Once the training is finished, the YOLO model can return a list of objects found an image, with the associated bounding boxes and confidences.
Use OpenCV to do fast prediction
Our existing process is based on a chatbot, which guides the customer through the different steps of the claim declaration and collects the phone pictures. The pictures are sent to an AWS S3 bucket; the upload triggers a Lambda function which runs the prediction model on the image. The chatbot then uses the result of the analysis to determine the next steps in the claim process.
Therefore, the model needs to be fast and run within the small computational power of a Lambda function.
This constraint prevents us from using the built-in function of the Darknet model, which takes too much time to predict with a Lambda function infrastructure. Fortunately, OpenCV (the most used computer vision library) has a module to load Deep Neural Networks (DNN) such as the Darknet. With a few lines of code to load the model and our custom weights, we can predict bounding boxes and confidences for the objects found. This requires us to write a few more lines to process that detection and take care of removing the irrelevant detections, and within less than a second we know whether the image is indeed a smartphone with a damaged screen.
3. How to apply it to video object detection
a. Video as a basic stream of frames
As we mentioned in the introduction, our end goal is to analyze a live video stream; this provides a more seamless customer experience and allows us to run advanced fraud detection.
The first step was to make the model work locally on a pre-recorded video. This was quite simple as a video is basically a succession of single images. We just need to loop over every frame and do the object detection for every single one of them and we’re done!
This naive approach works well but is way too long, barely reaching 1 frame per second with a CPU inference and about 5 FPS with a GPU.
As we want the user to see the bounding boxes prediction live while recording the video, these framerates are not enough to give a fluid experience. It means that we now have two problems to deal with: get our model to run on a live stream from the customer’s device (rather than on a pre-recorded video), and increase the prediction speed to be able to display it in real time.
b. Aiortc to handle real-time communication#
To tackle the first issue, we need to get the video feed from a device camera directly in the browser, as we want our claim process to be accessible without installing an app. Luckily, this is exactly what Web RTC(WebRTC — Wikipedia) is for! Even better, there is a python implementation of this standard called aiortc(aiortc/aiortc), allowing us to easily set up a Web RTC server. It even has a good example of something very similar to our project inside the GitHub repo with the https://github.com/aiortc/aiortc/tree/main/examples/webcam, which “illustrates how to read frames from a webcam and send them to a browser”. This example and the “server” example from the same repo became our working canvas to communicate with a client and get a live video stream from it. (For interested in our modifications to the aiortc examples, here you can find the full code of our server.py file : Custom server code for damaged phone detection)
Another interesting aspect of the library is the implementation of a data channel (also part of the Web RTC spec) which enables us to send dynamic data from the server to the client. We mainly use it to transfer some stats when developing/testing, but it could also be very useful to delegate part of the work to the client, or as a control channel.
With this implementation we can now basically communicate in real-time with a client browser, send the live video feed taken from the camera to the server, where we can do the hard work of object detection. As soon as a frame is treated, we can send the prediction information back to the client and display it. We still have the problem of predicting as fast as we get frames in order to display it live.
c. GPU for fast inference
As noted earlier, GPUs bring a huge performance increase over CPUs when dealing with computer vision deep neural network. We tested this on a local server and the performance increase was undeniable, but we wanted to rely on a cloud infrastructure for this task. We chose to use an AWS EC2 g4dn.xlarge instance for this task as they are relatively simple to use and cheap for GPU usage. Setting up the server and prediction code on the VM was straightforward, and once correctly configured we were able to predict up to 20 FPS, which starts to be enough for a fluid display.
d. Optimization and custom rules
With the basic video-processing pipeline working, we focused on how to optimize our treatment. Predicting at 20FPS is good but the video feed still gave us 60 FPS to work with, which means that by the time we predict on 1 image we have got 2 more coming in the pipeline. You can clearly see that this leads to an exponentially increasing delay between the recording and the display after detection.
Our first step was to naively only analyze 1/3 of the images coming from the client. If the frame is predicted on, we display the true detection, if not we just display the last detection as in 3 frames the object has not moved by a lot inside the image. There is an easy improvement on this naive approach: instead of arbitrarily working on 1 out of 3 images, we only work on the last incoming frame. This means that while the model is busy inferring we drop every incoming frame (and display the last prediction made) and once it is finished, we start work on the latest frame sent by the client. Even if we still roughly evaluate 1/3 of the overall frames, this ratio is now adapted dynamically based on the performance of the server.
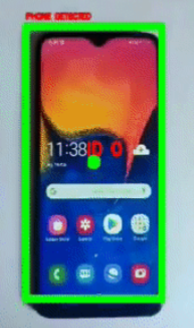
Another aspect to deal with in this particular use case is to make sure that during the video detection, there is strictly one smartphone. Our logic goes like this: while there is no detected phone, we search for one. When we firstly find a phone, we have to make sure that it does not exit the image nor that another phone appears during the video, which could be fraudulent behavior (for example,changing the phone between the damage detection and the IMEI step). To accomplish this, we use object trackers which are able to follow moving objects, even if they “disappear” for a few frames (hidden by something else or just the model not detecting it). Once a phone is detected, a tracker id is assigned to it, and we can keep track of it if the user moves the camera, if it exits the frame and/or another phone is also in the image.
# centroid tracking
objects = ct.update(prev_phone_bbox, last_objects = objects)
  for (objectID, centroid) in objects.items():
    text = "ID {}".format(objectID)

    cv2.putText(img, text, (centroid[0] - 10, centroid[1] - 10),
      cv2.FONT_HERSHEY_SIMPLEX, 0.8, (0, 0, 255), 3)
    cv2.circle(img, (centroid[0], centroid[1]), 10, (0, 255, 0), -1)
Link to the centroidtracker class used in this project : Neoanarika/object-tracking-detection
With these trackers in place, we can implement custom rules to determine whether or not to accept a claim. Those rules are defined quite simply:
- the phone must not leave the video;
- for a certain number of continuous frames we have to detect the smartphone and the damage on it.
Of course, those rules can be adapted to expanded to track other business rules we want to implement.
4. Conclusion about video object detection
Below you can find a gif of the video detection process. We have a working proof of concept to remotely analyze a live video stream, give real-time feedback to the user, and take business decisions based on the analysis.
So, what’s next ? There is still some work to improve the detection logic and how the information is displayed to the user in the video. For this, it seems interesting to send the detection data back to the browser through the data channel and let the browser overlay the relevant information on the video feed.
Another major axis of improvement we have yet to work on is the scalability of this project. Indeed, at this stage we can only handle a very limited number of concurrent sessions, as we have a capped total number of predicted frames per second. An obvious way to deal with this is to scale the set-up, either vertically (rent a bigger EC2 instance, with more GPUs) or horizontally (several instances behind a load balancer). This would work but also have significant costs and operational impact. It would be nice to leverage serverless technologies as we do for the rest of our infrastructure but unfortunately, there are no Lambda functions with GPUs for the moment 😀